TRUST 950 Powerca@m zoom

     
Warning: changes may be found depending on models

 camera specifications

  • sensor CCD 3,1 megapixels
  • resolution 2048x1536
  • lens fixed focal length
  • 8 Mo internal memory
  • SD memory card
  • weight 170g with batteries
  • 2 AA batteries, consumption 170mA without screen, and 300mA with screen.
  • the images are numbered Phto0001 which is reset at each "all delete".
  • no optical viewer
  • price: 149 euros at Forum in 2003

For more information, see Trust.com


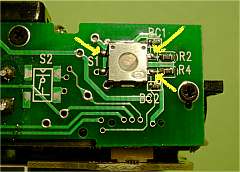
 The digital zoom has no interest.

The camera automatically shut off after one minute. However, when holding the exposure preset, the camera doesn't shut off.

With the camera used, a urban landscape under winter sunshine had a light magenta tint. The flash exposure is good. It is possible to make exposure corrections in the setup menu.

For kap, the "ground " (S1) and "exposure" (R2) connexions are linked on the external male plug. This plug must be inserted, then the lens cover is open whilst the camera is kept aimed on the subject. Thus, the camera will stay power on, and the exposure will be the same for all the pictures as it can be seen from the yellow frame in the center of the screen.
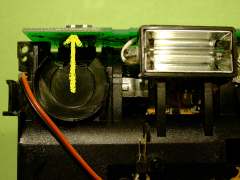
Dismounting:

  • remove the batteries and the memory card
  • let open the battery compartment
  • unbind the label from the bottom
  • mark an index on the landscape/macro button
  • take off 2 screws on the bottom, 1 screw on USB side, 1 screw on battery side.


  • dislocate the bottom whilst raising the front cover
  • dislocate the top whilst raising the back over the flash
  • take apart the back,recover the strap ring, and the USB cover
  • the battery gate will separate by itself
  • recover the landscape/macro button
  • raise the shutter button, and take apart the front cover

connexions:

  • prepare a plug made of 3 connectors from a female bar with 2.5mm step
  • solder 3 thin wires 30mm long each; use different colors
  • notch the circuit board near BC1 to pass the wires
  • spot the connections on the shutter switch
  • solder the 3 wires on the posts of the switch, facing S1, R2, R4
  • stick the female plug with araldite glue on the circuit board underneath the shutter button
     
    S1 -> common, or ground
    R2 -> exposure preset
    R4 -> shutter release


re-assembly:

  • On the front cover, mark the place of the plug, and drill 3 holes Ø1mm aligned with 2.5mm step
  • put back the front cover; insert the male plug, and check
  • bring up the back cover,
  • put back the landscape/macro button
  • put back the battery gate, the strap ring, and the USB cover
  • close completely, put the screws back