Over load
Stronger winds make more pull and
can overload the kite ability to fly. I remember once in
Dieppe festival when a sudden and extreme gust washed away
all kites. My Calomil kite pulled so much that I couldn't
resist until the wood frame broke.
When reaching the limits, a compensator
on the bridle will decrease the pull and the kite keep flying.
|
|
Kite behaviour
The kite pull increases as the
wind is getting stronger. The pull is the resultant of the
lift and the drag. In moderate winds, the lift increases
more than the drag so the line angle is going greater. Then
as the wind becomes more and more strong, the drag increases
more than the lift, thus the kite is loosing altitude, the
angle of the kite line is getting lower and the angle of
attack of the kite increases. That brings more pull and
it ends with over load on the kite
|
Compensator action
The compensator is set on the lower strand of the bridle.
As the pull on the line increases, over its minimum threshold
the compensator extends.
|
|
Now, the lower strand being longer, the angle of attack lessens.
That decreases the pull on the kite.
|
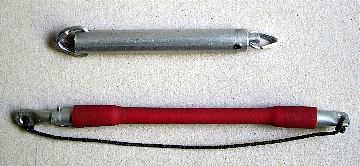
Compensators
There are two kinds of compensator: the spring compensator
and the bungee compensator.
The spring compensator is a little heavier, has fixed limits
because of the spring, but lasts forever.
The bungee compensator is lighter, can be adjusted to the
desired values and can have longer extension. However, the bungee
shall be regularly replaced |
|
-
Both compensators have minimum and
maximum threshold.
|
MAKING SPRING COMPENSATOR
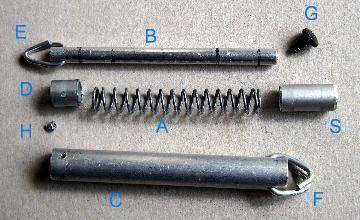
- A spring Ø 6 mm
- B central aluminum tube Ø 4x1 mm
- C external aluminum tube Ø 8 x 1 mm
- D and S stops aluminum tube Ø6 x 1 mm
- E and F rings in wire Ø 1,6
mm
- G and H screws
When mounted the spring is slightly compressed at the minimum
stress. |
|
MAKING BUNGEE COMPENSATOR
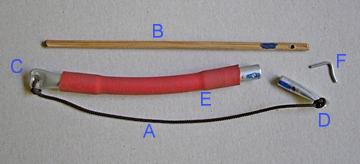
- A line limiting maximum extension
- B internal stem for minimum extension
- C1 and C2 two ends in aluminum tube
- D tube fitted in one C end.
- E tubular bungee
- F pin going through B and D
-
- Paste D on B, insert in C2 and drill a small hole through
it
- Insert B inside C+E+C
- Expand the bungee and fix the pin in the hole
- Set and adjust the line A to the maximum expansion.
-
|